Accounts Receivable Reports
You can print accounts receivable reports that show balances owed by your customers. GlobalWare provides three types of reports for account receivables:
- Billing notices
- Receivables by general ledger account (organized by customer)
- Receivables by age of invoice (organized by customer)
For the accounts receivable report by general ledger account or by age of invoice, you can also organize the report first by branch (or booking agent) and secondarily by customer; or you can organize it first by branch, secondarily by booking agent, and thirdly by customer.
These three reports include receivables for open items only.
Backdating (for the Accounts Receivable Reports by General Ledger Account and by Age of Invoice)
For the accounts receivable reports by general ledger account and by age of invoice only, if the date you specify for the cutoff date on the Accounts Receivable Reports dialog box is earlier than the current date, you can use the Check GL History for Backdating option to read the general ledger to determine balances owed by customers as of that date. For example, a ticket was issued for $500 on 1/30, a receipt was entered for $300 and applied on 2/2, and the report was printed as of 1/31. If you do not select this option, the amount reported will be $200, even though its balance was $500 on 1/31. If you select this option, the amount reported will be $500. Because the report needs to review each accounts receivable transaction, whether it is open or closed, to determine its balance as of the specified date and review the general ledger, this option might make the report run much slower than when the general ledger is not read for the history. (If you do not check this option, the report does not review the general ledger and skips all closed accounts receivable transactions.)
Notes:
- If any general ledger records for an item have been compressed, the report cannot determine the balance as of the cutoff date. The report determines if the general ledger has been compressed for each item. If it has been compressed, and the current balance of the item is zero, the item is excluded from the report. If it has been compressed, and the current balance is not zero, the item is included on the report with the current balance. Therefore, if you backdate to a date earlier than the most recent general ledger compression date, the report might not be accurate.
- Backdating might make the report take significantly longer to process.
Running the Report
To run the report:
-
On the A/R submenu, click Accounts Receivable Reports. Alternatively, click the Accounts Receivable Reports (
 ) icon on the GlobalWare icon toolbar.
The Accounts Receivable Reports dialog box appears with Report Type of Billing Notices selected. This dialog box displays additional fields if you select By G/L Account or By Age of Invoice from the Report Type drop-down list.
 Field descriptions
The following table describes the fields on the Accounts Receivable Reports dialog box.
Field Description Report Type
Type of accounts payable report you want to generate. The following types are available from the drop-down list:
-
Billing Notices – Provides accounts receivable statements for your leisure clients. You can run billing notices based on the branch in the account ID record. If you select a specific branch, the report is limited to accounts for which the account ID's branch is the specified branch. The report does not restrict invoices to that branch. For example, if you set up an account ID for customer MARCOM, specify branch 0001 for the customer, and then specify branch 1 for billing notices, all MARCOM items will be included in the notice. If you specify branch 2, no items will be included (that is, no report will be created).
Note:GlobalWare does not include unposted deposits on billing notices. A warning appears because the billing notice will be inaccurate.
-
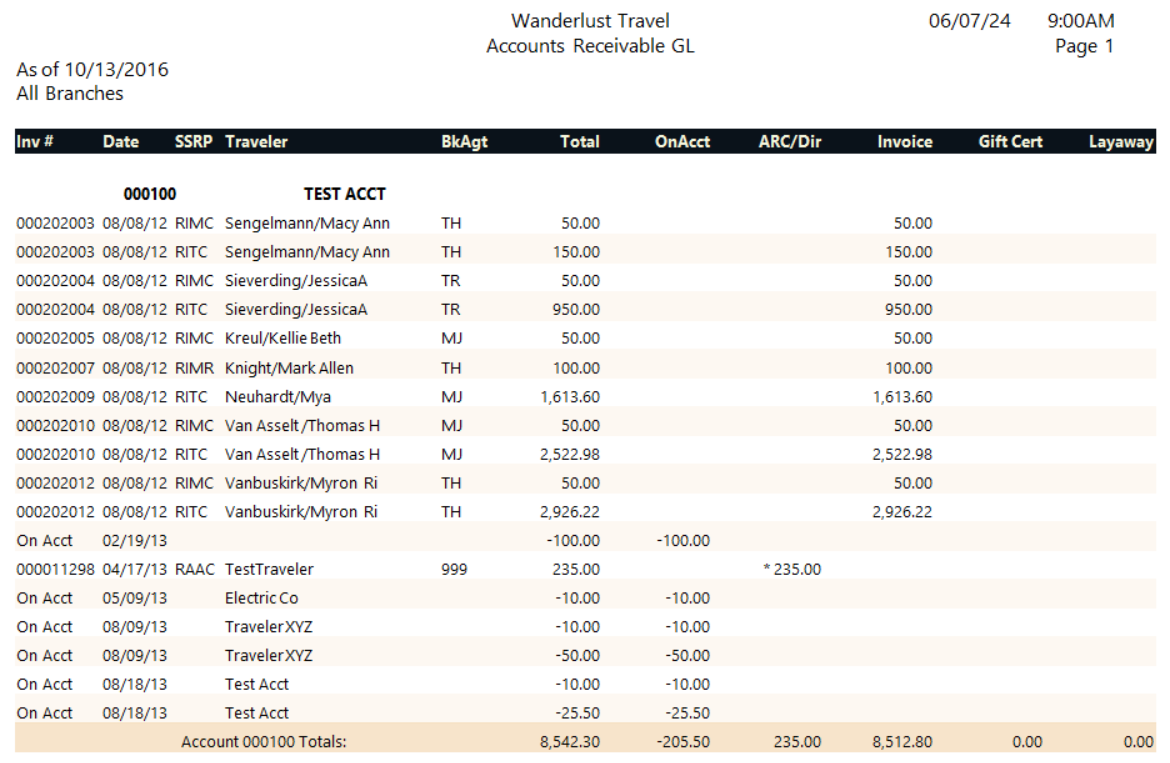
By G/L Account – Lists open receivables separated into columns for general ledger receivable accounts: On Account, ARC/Direct, Invoice, Gift Certificate, and Layaway.
Invoice items are split into ARC/Direct and Invoice settlement types because in cash-basis accounting, ARC/Direct non-plastic items post to a receivables account in the general ledger, but items with an Invoice settlement type post to accounts payable. The A/R total of the ARC/Direct column should balance with the receivables chart in the general ledger. Unposted ARC/Direct items are indicated on the report with an asterisk ( * ). For accrual accounting, unposted ARC/Direct and Invoice items are indicated with an asterisk. The total of ARC/Direct and Invoice columns should balance with the receivables accounts in the general ledger.
For more information about balancing accounts receivable subledgers with the general ledger, see Balancing of Receivables Against the General Ledger.
- By Age of Invoice – Lists open receivables separated into columns for aging periods. You can specify the number of days in the aging period in the # Days field. For example, if you specify 30 for the aging period, the transactions are separated into 0-30 days old, 31-60 days old, 61-90 days old, and over 90 days.
Branch
Branch or location group. The report will include transactions that match this branch or location group.
For billing notices, specify a branch or location group to limit the report to account IDs associated with that branch or branches. For the accounts receivable report by general ledger account or by age of invoice, specify a branch or location group to limit the report to transactions in that branch or branches.
To find and select a branch or location group, click the lookup (
 ) button. The Find Branch screen appears. For details, see Using the Lookup Buttons and Screens.
Account ID
Full or partial customer account ID. If you specify a full account ID, the report will include transactions for this account ID only. Use the wildcard character (*) to specify a partial account ID, as shown in the following examples:
71*
Includes transactions for account IDs that begin with "71" (for example, "7126" and "7153").
*71
Includes transactions for account IDs that end with "71" (for example, "2071" and "10071").
*71*
Includes transactions for account IDs that contain "71" anywhere (for example, "7126", "10713", and "10071").
You can also specify @TAGGED to include transactions for tagged accounts only, or @ followed by a customer interest code (for example, @SKI) to include transactions for only accounts with that interest.
Leave this field blank to include transactions for all customers.
To find and select a customer account ID, click the lookup (
) button. The Find an Account ID screen appears. For details, see Using the Lookup Buttons and Screens.Cust Type
Customer-type code. The report will include transactions that match this customer type. To select more than one customer type from the drop-down list, click each customer type you want to select while pressing the Ctrl key. On-account items will not be included if you specify a customer type. Leave this field blank to include transactions for all customer types.
Cutoff Date
Accounts receivable due date through which you want the report to include data. Items that have an accounts receivable due date that is up to or matches this date will be included on the report. This date is required.
# Days
Number of days to use for the aging period on the By Age of Invoice type of accounts payable report. This field is available only if By Age of Invoice is specified in the Report Type field.
Sort 1
First-level field to use for sorting report data. The following fields are available from the drop-down list: AR Due Date, Invoice #, Invoice Date, Sale #, and Traveler. You can also select None.
Sort 2
Second-level field to use for sorting report data. The following fields are available from the drop-down list: AR Due Date, Invoice #, Invoice Date, Sale #, and Traveler. You can also select None.
Show Chart/Graph
Indicates whether the report should present data in a chart or graph based on the selection in the Graph Type field. This option is available only if By G/L Account or By Age of Invoice is specified in the Report Type field.
Graph Type
Type of chart or graph you want GlobalWare to use for report data. This field is available only if Show Chart/Graph is selected. For information about the charts and graphs you can use, see Chart and Graph Options.
Summary Only
Indicates whether to create a summary-only report (subtotals and grand total only). This option is displayed only if By G/L Account or By Age of Invoice is specified in the Report Type field.
Subtotal by Branch
Indicates whether to sort and subtotal the report by branch and then account ID. This option is displayed only if By G/L Account or By Age of Invoice is specified in the Report Type field.
Page Break by Branch
Indicates whether to start each branch on a new page. This option is available only if Subtotal by Branch is selected.
Subtotal by Bk Agent
Indicates whether to sort and subtotal the report by booking agent and then account ID. Non-invoice items (receipts, adjustments, checks) do not have a booking agent and, therefore, will be sorted separately. This option is displayed only if By G/L Account or By Age of Invoice is specified in the Report Type field.
Page Break by Bk Agent
Indicates whether to start each booking agent on a new page. This option is available only if Subtotal by Bk Agent is selected.
Check GL History for Backdating
Indicates whether the By G/L Account type of accounts payable report should include general ledger historical data for backdating purposes. This option is displayed only if By G/L Account or By Age of Invoice is specified in the Report Type field. If you select this option, GlobalWare reviews the history in the general ledger to determine balances as of the cutoff date. If you do not select Snapshot Report, the cutoff date represents when items were entered into GlobalWare.
Snapshot Report
Indicates whether GlobalWare should create a snapshot report of what your general ledger was for account receivables on the system date indicated in the Cutoff date field. This option is available only if Check GL History for Backdating is selected and if By G/L Account is specified in the Report Type field.
-
-
Complete the fields as appropriate.
Note: The Cutoff Date field is required.
- Choose one of the following print options:
To print the report immediately, click PRINT.
The Send to dialog box appears. Select a report destination. For more information, see Printing Overview.
To store the report as part of a batch for printing later, click BATCH.
The Choose a Batch dialog box appears. For more information, see Batch Printing.
Report Example
Note: Branch: All* in the report header indicates that the user does not have access to all agency branches and that this report considers only those branches to which they have access.
Accounts Receivable Report example