Printing a Query in the Invoice File
To print a report from an invoice query:
-
Enter the query search criteria. When results appear in the Search Results grid of the Invoice Edit & Query screen, click SORT FOR REPORT.
The Sorts & Subtotals dialog box appears.
-
Select the sorts from the drop-down lists. Select Subtotal Sort to subtotal on the selected field. Select Page Break to start each subtotal group on a new page.
Note: When running the report, you can choose to send the report to a Microsoft Excel spreadsheet (XLS format). If you select Page Break, each page will appear on a separate worksheet within the generated Excel spreadsheet. For example, if you choose to sort by account ID, and if you select Subtotal Sort and Page Break, subtotals for each account ID that is listed in the Search Results grid on the Invoice Edit & Query screen will appear on separate worksheets by account ID.
If you select Comment Line to sort/subtotal, enter the comment line number in the Line # field that appears.
The Inv Month sort selection is the month and year from the invoice date.
-
Options in the bottom right area of the dialog box are:
- Print Totals/Subtotals Only – Prints only totals and subtotals.
- Include Commission on Report – Includes commission amounts on the report. Commissions are not included unless this option is selected.
- Print Names on Subtotals – Prints names/descriptions on the subtotal lines of the Invoice Query report. With this option selected, only the code and name/description of the current subtotal print. For example, if you subtotal by form of payment, printing without names prints the form of payment code (P, C, R, or A) on the subtotal line while printing names prints the form of payment code and description (Plastic, and so forth) on the subtotal line.
- Include VOID Values on Report – Includes voided invoice items on the report. This option is displayed only if voided items are listed in the Search Results grid on the Invoice Edit & Query screen. Voided items appear in red on the report.
- Landscape (More Data) – Prints wide pages that include entire traveler names.
- Use Report Name – Prints the report name you provide in the box below this option. If you select this option and do not provide a report name in the box, GlobalWare will not print a report name on the report. If you do not select this option, GlobalWare uses "Invoice Query" as the report name.
-
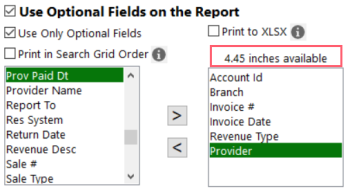
Use the Use Optional Fields on the Report, Use Only Optional Fields, and Print in Search Grid Order options in the following combinations to print with different results:
Notes:
- The report without optional fields prints net commission (commission and discount/markup combined). The report with optional fields can print commission and discount/markup as separate fields, but not combined.
- Amount fields are right-justified and look better when printed last in the list.
- If you use only optional fields and subtotaling, do not put amount fields in the first four to five inches. If you do, the amount subtotals and subtotal text ("Totals for …") will print in the same place.
-
The text above the right list box indicates how much horizontal space on the page is available for optional fields. With no optional fields selected, available space is 4 inches. If you select Landscape (More Data), available space increases to 5.5 inches. If you select Use Only Optional Fields, available space increases to 8.1 inches and 10.35 inches respectively. As you add optional fields to the right list box, you will see that the available space decreases. Each field has different space requirements. A message appears when you attempt to add a field and not enough space is available for it. You can remove the space restriction by selecting Print to XLS. Selecting this option indicates you will be printing the report directly to a Microsoft Excel spreadsheet, which has no space restrictions. You now can select as many optional fields as you want.
When you select Print to XLS and click PRINT, the only file type option available for printing will be XLS.
- Fare Saved and Lost Savings are calculated from Total Cost and Max Fare/Low Fare. These are the same as Corporate Reports, except in Invoice Query, Total Cost is always used, even for exchanges.
-
To print comment fields on additional lines, select Print Comments Fields on the Report. Comments print on additional lines following the main detail. (To print comment fields on the main line, see Defining Comment Lines for the Optional Field List.)
- Select the number of comment fields you want to display per line in the Number of Comment Fields per Line field. You can print one to five comment fields per line.
- Choose which comment fields you want to print. Add a comment field by highlighting a field on the left and clicking the right arrow. Remove a comment field by highlighting a field on the right and clicking the left arrow.
- Fields print in the order they appear in the list. You can rearrange the fields by dragging a field to another place within the list.
-
To run the report, click PRINT. For information about the report destination options, see Printing Overview.
-
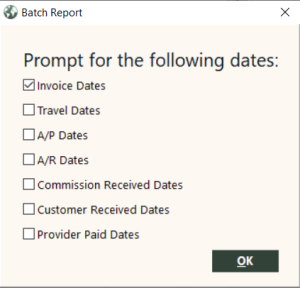
To print the report in batch, click BATCH. When you click BATCH, choose the categories for which you want to prompt the user to enter dates. The options are invoice dates, travel dates, A/P dates, A/R dates, commission received dates, customer received dates, and provider paid dates. Click OK. When a user prints this batch report, they are prompted for the dates you chose.
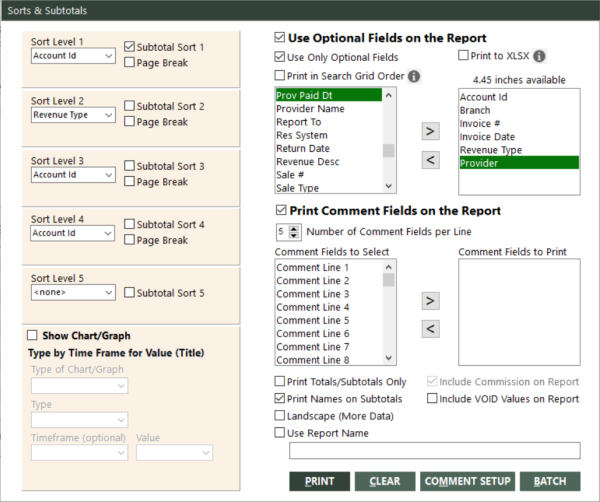
To quickly remove your selections from the Sorts & Subtotals dialog box and reset this dialog box to its default settings, click CLEAR. To restore your selections after having cleared them, press Ctrl+Z. Keep in mind that if you clear your selections and then exit the screen, you cannot restore your selections.
Print to File Note
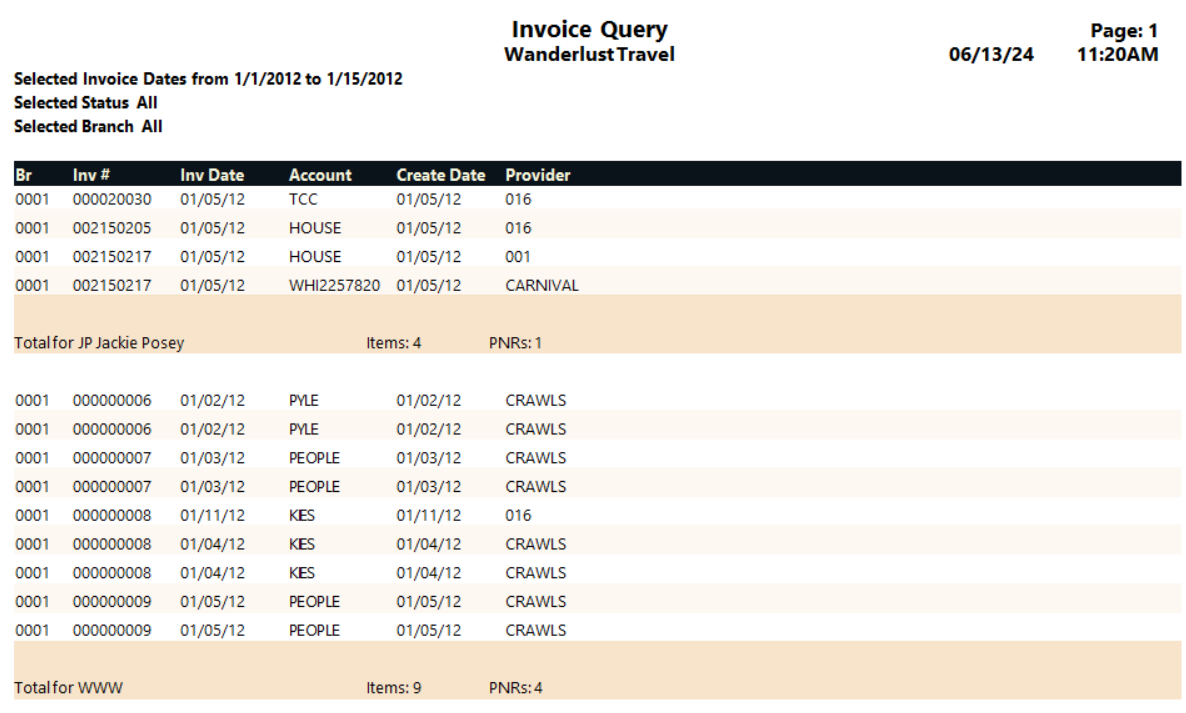
If you print to file (or e-mail, which prints to file), there will be two lines for each subtotal and the grand total: one line with the total text (for example, "Total for A Air") and number of items, and another line with totals for the amount fields.
Comment Line Subtotal Examples
Here are some examples of how you can use the subtotal on comment lines.
Find Apollo Manually-Booked Hotels
GlobalWare stores the room type for Roommaster hotels in Comment line 103. Because manually booked hotels do not include this information, the invoice item for them does not have a line 103. If you query hotels (travel type = H) and then sort on line 103, the invoice items with no line 103 sort at the top of the report.
To get a count of manually-booked versus Roommaster, select Subtotal Sort and also Print Totals/Subtotals Only. The first subtotal gives the manually-booked count. This number subtracted from the grand total count is the Roommaster count.
Find Missing Comment lines
To find any missing comment line, subtotal on that comment line. Those items missing the line will be in the first subtotal section.
Find Apollo Missing MIR Sequence Numbers
GlobalWare optionally stores the MIR sequence number in Comment line 117. You can find the missing sequence numbers by subtotaling on line 117 and selecting the Print Totals/Subtotals Only option. Then review the report for out of sequence numbers. If you have multiple locations, select Ticket Location for subtotal 1 and Comment Line 117 for subtotal 2 because each pseudo city has its own set of MIR sequence numbers.